If you’re selling your old hard drive, giving it away, or just throwing it out, you should completely erase the data from it. You probably don’t want to live the rest of your life knowing that your dirty, dirty secrets are still floating around somewhere, waiting for a bored nerd to recover them…
When it comes to gaming hard disk drives and solid-state drives, the great majority of the population believes that formatting a drive erases it entirely, but that is a misconception. In this short and sweet guide, we’ll show you how to properly and securely erase an SSD.
HDD & SSD Differences
HDDs (hard disk drives) and SSDs (solid-state drives) are the two main types of storage drives nowadays.
Hard disc drives consist of moving and stationary parts. Inside the case, there are rotating metal discs on an axis. Above the surface of the discs is an electromagnetic arm that reads and writes onto a different, magnetic disc. This was revolutionary at the time it was invented because it had memory divided into sectors, each with its own address that could be easily and rapidly accessed at any time.

Solid-state drives do not have any moving parts. Instead, they have an enormous number of transistors that can be charged. Depending on the charge of a transistor, it can carry a signal of 1 or 0. A certain number of transistors creates a cell, and a number of cells form pages into which the data is stored. Because SSDs don’t rely on moving mechanical parts, they read and write data much faster than older HDDs.
That’s the short version of it. For the longer one, read up on our SSD vs. HDD comparison.
What Does Formatting Mean?
As we mentioned before, the popular belief is that formatting means erasing data from a storage drive. However, data erasure is only a side effect of formatting, not its purpose, and the data isn’t actually erased. It may be inaccessible to everyday PC users like you and me, but people with specialized knowledge and software can recover most or all of the data from a recently formatted drive.
Related Reads:
When we format a storage device, the old file system is removed and a new one is created. (A file system is a set of instructions that tells the computer how and where to write data.) When a new file system is created, the old data stored on the drive is still there—the new file system simply regards it as available space. New data will eventually be written over the old data, but it would take months or years of regular use to overwrite every trace of it.

All of this formatting business is only relevant to HDDs—SSDs don’t need to be (and shouldn’t be) formatted. Even the best SSDs for gaming have a limited amount of transistors for reading and writing. When you format one, the computer will “spend” some of its limited read and write cycles, shortening the drive’s lifespan unnecessarily.
How to Securely Erase an SSD: Simplest Method
To securely wipe your SSD, you will need special software. There are many different programs, but in this guide, we will use Western Digital Dashboard. In order to perform a secure erase on your SSD, follow these steps:

Start Western Digital Dashboard. In the main window, you will be able to see different monitoring reports and other tools for your SSD.
- Choose the ‘Tools’ tab at the top of the window
- On the left side of the ‘Tools’ window, pick the ‘Erase’ option
- Choose the ‘Secure Erase’ option on the main window and follow the instructions to complete the process
In case your SSD is ‘frozen’ or locked, you will not be able to wipe it right away. If you have a SATA SSD, unplug the power and plug it back in. That should reset it and allow you to erase it. If you have an M.2 SSD, unplug the power, remove it from the motherboard, put it back in, and boot from USB in order to erase the SSD.
How to Securely Erase an SSD: Alternative Method
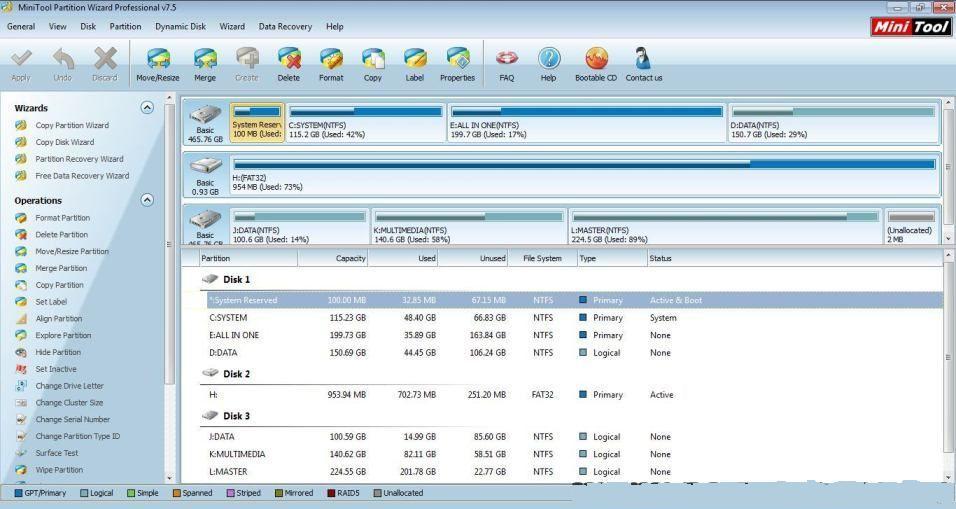
For this method, you will need a program called MiniTool Partition Wizard. It is easy to use and free.

After installation of the software, follow these instructions:
- Start MiniTool Partition Wizard. In the main window, you will be able to see all your storage devices.
- Click on the storage device you want to erase and a drop-down menu will show up. Choose the option ‘Wipe Disk.’
- In the pop-up window, you will see 5 different options:
- fill sectors with zero (recommended)
- fill sectors with one
- fill sectors with zero and one
- DoD 220.22-M (3 passes)
- DoD 5220.28-STD (7 passes)
- Choose the desired option and click ‘OK’
- Click the ‘Apply’ button in the upper left corner of the window and wait until the process is complete
Securely Erase an SSD in BIOS
There is another possible solution. Certain motherboards have the option to securely erase storage devices within BIOS. You will have to check the specifications of your motherboard and manufacturer’s manual in order to find whether your motherboard can do this, and if so, how.
Final Words
Formatting does free up space on a hard drive, but it’s a satisfactory solution only when you continue using the device. When you intend to part with an old drive, you should make sure your old data cannot be accessed by anyone else.
Nowadays most storage drives carry sensitive data, whether it is personal or work-related. It is critically important to securely erase old storage devices before giving them away.