With a surprise February 2019 release, Apex Legends became one of the biggest hits of that year. It gathered a following of 25 million players in just a week. To this day, it still has a healthy player base.
Therefore, it is never too late to join the cause. However, before you play AL, you need to ensure that your system is up to scruff. It can be the difference between you winning a match and being knocked out in the early stages.

In this guide, we’ll explore and discuss ways in which you can tweak your PC and get the best settings for Apex Legends.
How to Make Apex Legends Run Smoother
Apex Legends is one of the best battle royale games of all time. It’s also a pretty decent looter shooter. If you want to survive and win some matches, you’ll need 60% skill, 5% luck and 35% equipment (hardware and system). We can help you optimize your hardware but you’ll need to take care of everything else.
Both amateurs and battle-hardened veterans can benefit from the tips in this guide. While Apex Legends is a free-to-play game, this does not mean it will run on any old potato.
Before you can start optimizing your PC for Apex Legends, you need to ensure that it meets the minimum system requirements. In an ideal world, your PC should meet the recommended system requirements but you should not have to be a millionaire to enjoy some quality gaming.
Apex Legend System Requirements
In this section, we’ll go over Apex Legend’s minimum and recommended system requirements. Before continuing with the rest of this guide, make sure that your gaming PC meets the minimum system requirements.
Minimum System Requirements
- Operating System: 64-bit Windows 7 (and above)
- CPU: 6th Generation Intel Core i3/ AMD FX 4350 (or equivalent)
- RAM: 1333Mhz 6GB DDR3
- GPU: AMD Radeon HD 7730/ NVidia GeForce GT 640 (Direct X 11 compatible card)
- Network: 512 kbps internet connection (or faster)
- Storage Space: 22 GB
Recommended System Requirements
- Operating System: 64-bit Windows 10
- CPU: 3rd Generation Intel Core i5 / AMD Ryzen 5 (or better)
- RAM: 1333Mhz 8GB DDR3 (or better)
- GPU: AMD Radeon R9 290 / NVidia GeForce GTX 970 (or better)
- Network: Broadband Internet connection
- Storage Space: 22GB
*Note: These are the official system requirements taken from the developer, Respawn Entertainment, and the publisher Electronic Arts.
Once you have ensured your PC meets the above standards, you can continue with the rest of the guide.
Optimize NVidia GPU Settings for Apex Legends
If you want to squeeze out more frames per second and avoid stuttering or screen tearing, you need to ensure your graphics card settings are optimized.
In this section of the guide, we’ll explore the changes you need to make to your NVidia graphics card settings. If a setting isn’t available to you, just skip the step.
1. Open the NVidia Control Panel. You can do this by right-clicking on the NVidia system tray icon and selecting NVIDIA Control Panel from the context menu.
2. On the main window, make sure that the radio button marked ‘Use the advanced 3D image settings’ radio button is selected.
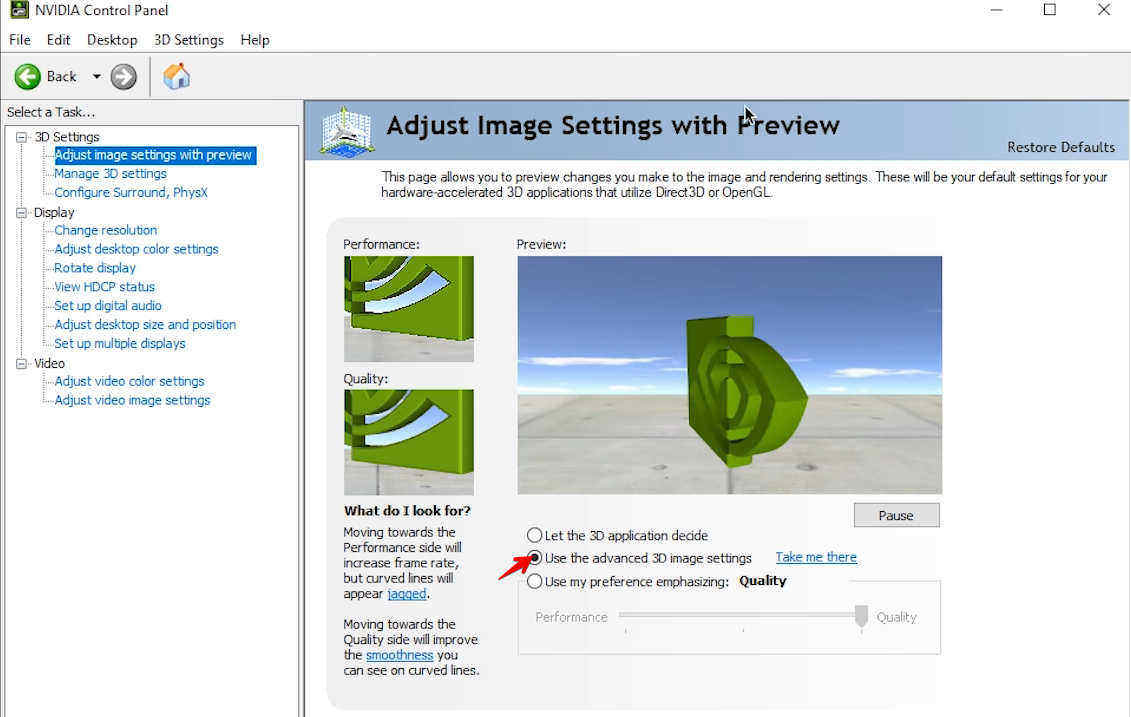
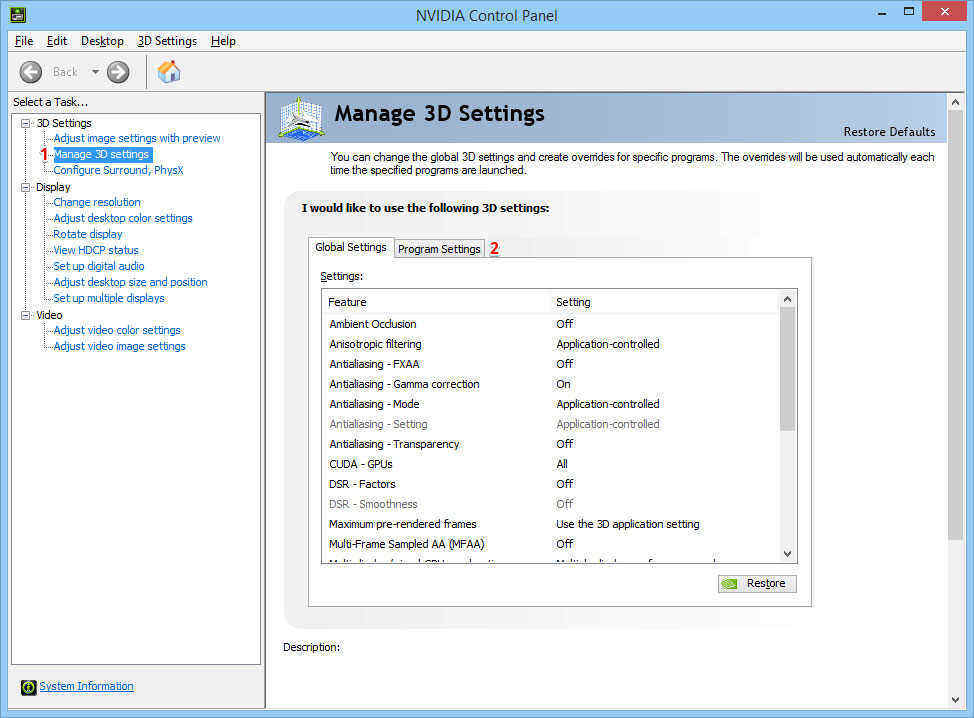
3. On the left side panel, click on Manage 3D settings.
4. The main window will open with Global Settings selected by default. Click on the Program Settings tab.
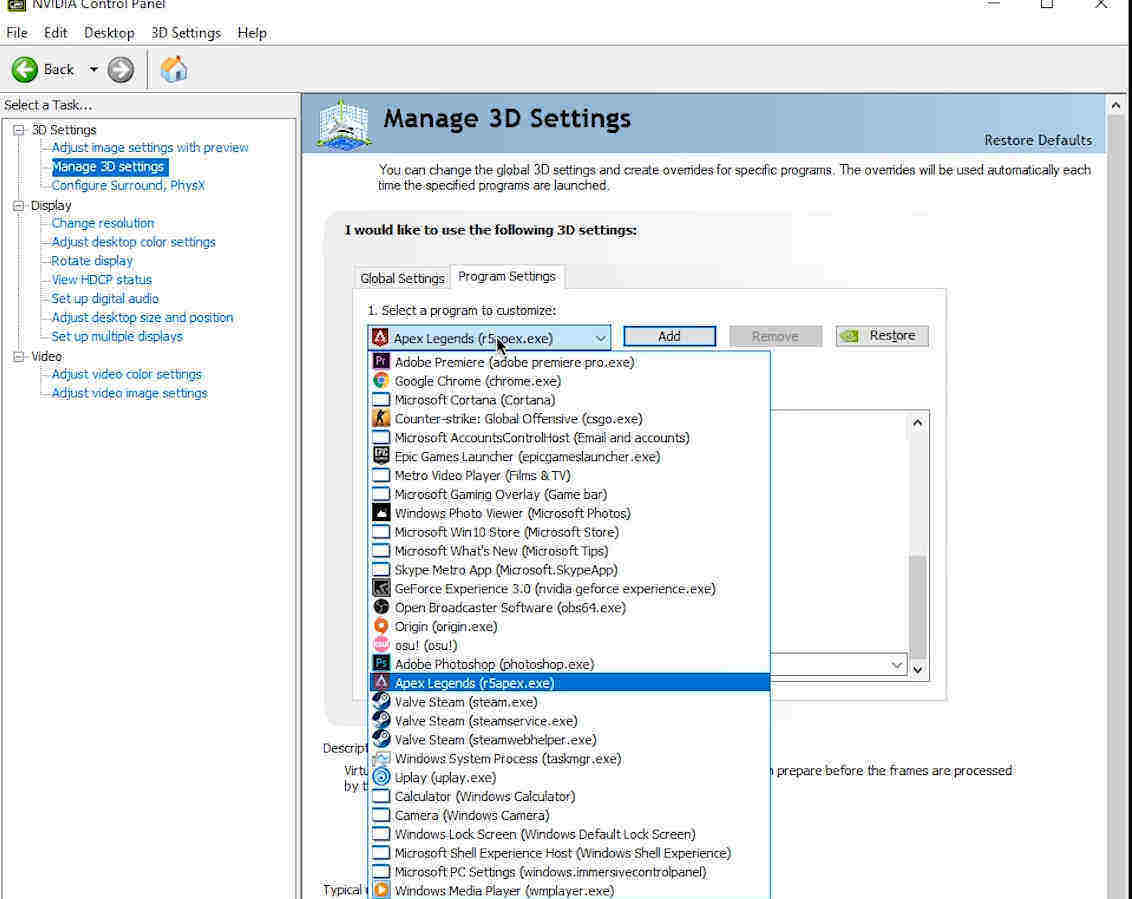
5. Expand the ‘Select a program to customize’ drop-down menu and search for Apex Legends.
*Note: If you cannot find Apex Legends in the list of the drop-down menu, click on the Add button next to it. This will bring up a window with a list of programs in it. If you can’t find Apex Legends in this list, you’ll have to click the browse button and manually find it under your Program Files.
6. In the ‘Specify the settings for the program’, you will see a list of features and settings. Set Anisotropic filtering to Off.
7. Make sure that all forms of Antialiasing (FXAA, Mode, Transparency, and Gamma correction) are set to Off.
8. CUDA –GPUs should be set to All (if you have this setting).
9. Maximum pre-rendered frames should be set to 1.
10. Multi-frame sampled AA (MFAA) must be set to Off.
11. Scroll down and set OpenGL rendering GPU to your NVidia graphics card (e.g. GeForce GTX 1070). This is important because it may have your embedded/built-in graphics card selected.
12. Set Power management mode to Prefer Maximum performance.
13. Set Preferred refresh rate to Highest available.
14. Set Shader Cache to On if you have an SSD. Set it to off if you have an old-fashioned HDD.
15. Turn on Texture filtering – Anisotropic sample opti…
16. Set Texture filtering – Negative LOD bias to Allow.
17. Set Texture filtering – Quality to High performance.
18. Turn on Texture filtering – Trilinear optimization.
19. Turn on Threaded Optimization.
20. Triple buffering should be set to Off.
21. Vertical sync should be turned off.
22. Virtual Reality pre-rendered frames should be set to one.
23. Click on Apply and then close NVidia Control Panel
These settings should help increase your FPS for Apex Legends. This should also decrease any input lag for the game.
Optimize AMD Radeon Settings
Many guides seem to leave AMD users out in the cold. We like to be inclusive here at GameGavel so in this section, we have included a list of steps for gamers using AMD graphics cards. You can use these steps to reduce input lag and increase FPS and visibility in Apex Legends.
1. Launch AMD Radeon Settings from your system tray or desktop right-click menu.
2. On the main screen, click on the tab labeled ‘Gaming’.
3. Select Global Settings.
4. Click on Anti-aliasing mode and set it to Override application settings.
5. Set Anti-aliasing level to 2X.
6. Turn on Anisotropic Filtering Mode
7. Under Texture Filtering Quality, select Performance.
8. Set Wait for Vertical Refresh to Always Off.
9. Set Tessellation Mode to Override application settings.
10. Set Maximum Tessellation Level to 32x.
11. After you’re done making the above changes, you can close the Radeon Settings screen.
Optimize Origin Settings
Unfortunately, in most cases, you need Origin in order to run Apex Legends. Sometimes Origin’s settings can be a bit of a hindrance. In this section, we’ll show you how to optimize Origin’s settings.
1. Launch Origin.
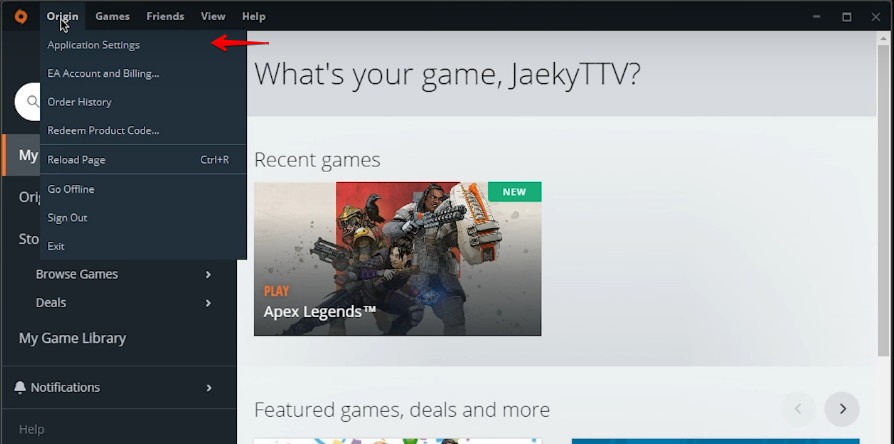
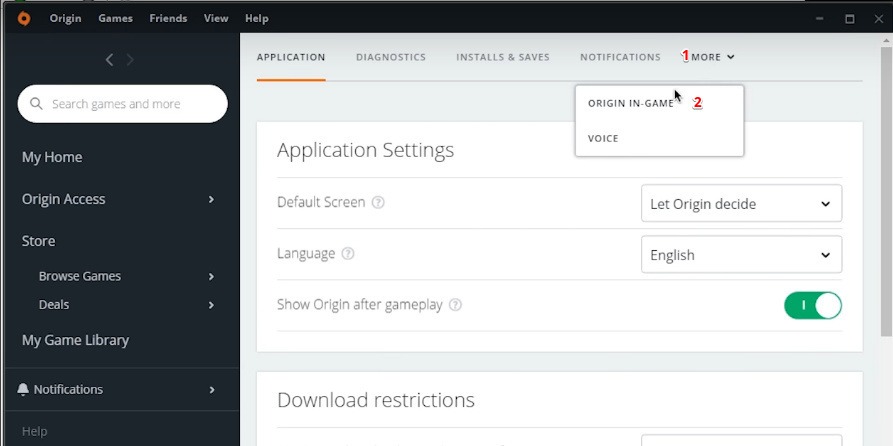
2. Click on the Origin menu Item at the top of the window.
3. Click on Application Settings.
4. Click on More.
5. Click on ORIGIN IN-GAME.
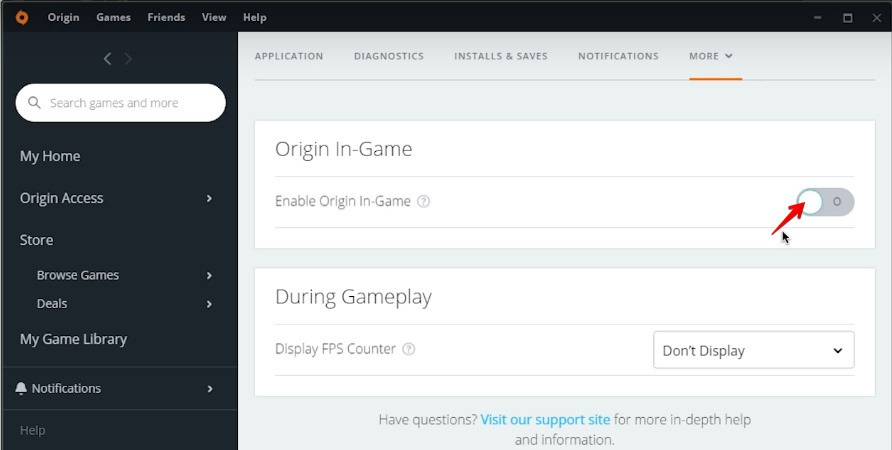
6. Under Origin In-Game, make sure that the Enable Origin In-Game switch is set to off.
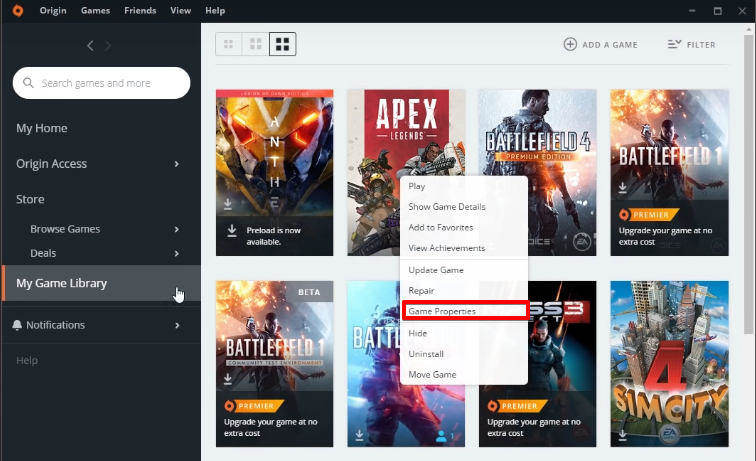
7. Click on the My Game Library and right-click on Apex Legends.
8. Select Game Properties from the pop-up menu.
9. Click on the tab marked ‘ADVANCED LAUNCH OPTIONS’.
10. Under Command line arguments type in ‘-fps_max 0’ or ‘-fps_max unlimited’ (without the quotation marks).
11. Click on Save.
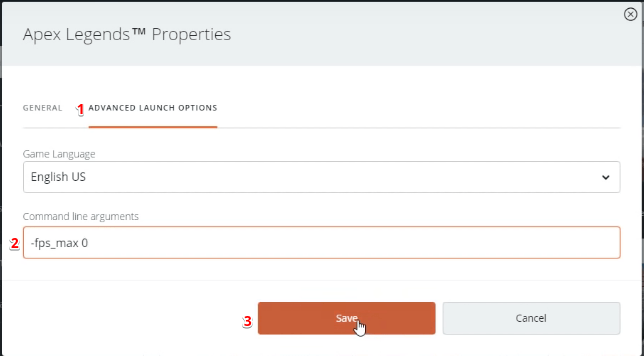
The above steps will disable any in-game interference from Origin. They also show you how to remove the FPS cap for Apex Legends. This is particularly effective for 240Hz monitors.
Optimize Apex Legends In-Game Settings
What we like most about Apex Legends is that it’s a great looking game. You don’t want to sacrifice its stunning visuals for FPS. So it’s important to strike a balance between visibility, FPS and visual quality.
In this section of the guide, we’re going to cover the best in-game settings for Apex Legends. These settings will not only help you increase visibility and improve input lag but they’ll help you get better at the game.
1. Run Apex Legends.
2. Click on Settings.
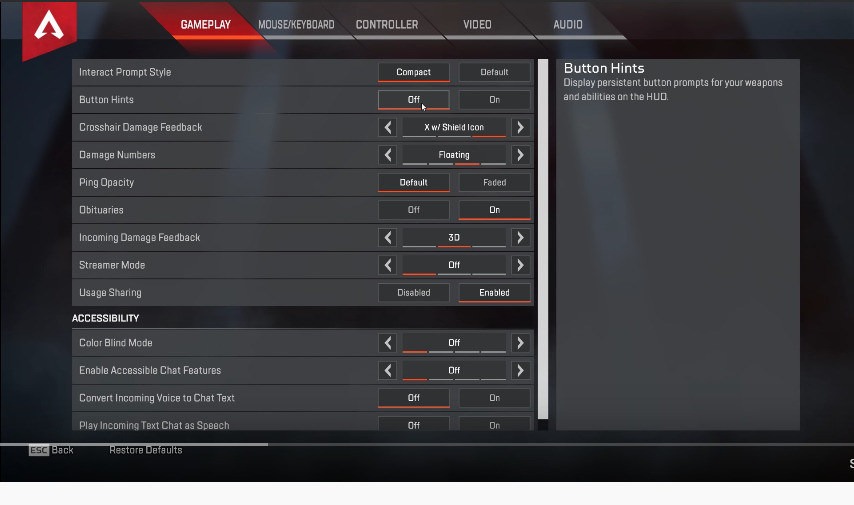
3. By default, Settings should open on the ‘GAMEPLAY’ tab. If not, click on it.
4. Set Interact Prompt Style to Compact. This will reduce the visual clutter on your screen.
5. Set Button Hints to off. If you are new to Apex Legends, you can leave this on.
6. Make sure that Crosshair Damage Feedback is set to X w/Shield Icon.
7. Set Damage Numbers to Floating. This will give you a more accurate description of the damage you are doing against an enemy.
8. You can leave Ping Opacity on Default or change it to Faded. This is a matter of preference.
9. Obituaries should be left On. This is basically your kill feed. It’s important to know who is still left in the game.
10. Set Incoming Damage Feedback to 2D.
11. Set Streamer Mode to Off (unless you’re a streamer).
12. Set Usage Sharing to Disabled.
13. Unless you have color blindness, you can set Color Blind Mode to Off. Apex Legends does not work like PUBG, where modifying your color blind settings will make stuff like smoke and blood splatter more visible.
14. You can leave the rest of the accessibility options off unless you need them.
15. Click on the MOUSE/KEYBOARD tab.
16. Set Mouse Sensitivity to 2.5.
17. Set ADS Mouse Sensitivity Multiplier to 1.0.
*Note: If you feel that you’re uncomfortable with the mouse settings, you can tweak them to suit your own style of play or preference.
18. Set Mouse Acceleration to Off.
19. Set Mouse Invert to Off.
20. You can leave the Movement keys as is or change them to anything you’re comfortable with.

21. Click on the VIDEO tab.
22. Set the Display Mode to Full Screen. This always gives you the best FPS.
23. Make sure that the Aspect Ratio and Resolution match your monitor’s native properties.
24. Set Field of View to 90.
25. Set Color Blind Mode to Off (unless you’re color blind).
26. Set V-Sync to Disabled.
27. Set Adaptive Resolution FPS Target to 0.
28. Set Anti-aliasing to TSAA. This reduces jagged edges and just makes the visuals look a bit better.
29. Set Texture Streaming Budget to None.
30. Set Texture Filtering to Bilinear.
31. Set Ambient Occlusion Quality to Disabled.
32. Set Sun Shadow Coverage to Low.
33. Set Sun Shadow Detail to Low.
34. Set Spot Shadow Detail to Disabled.
35. Disable Volumetric Lighting.
36. Disable Dynamic Spot Shadows.
37. Set Model Detail to Medium.
38. Set Effect Detail to Low.
39. Set Impact Marks to Disabled.
40. Set Ragdolls to Low/Disabled.
41. Click on the Apply button.
42. Click on the AUDIO tab.
43. Set Dialogue Volume to 45%.
44. Set Sound Effect Volume to 66% or more.
45. Set Music Volume to 25% or less.
46. Set Sound in Background to Off.
47. Set Subtitles to Off.
48. Set Play Incoming Text Chat as Speech to Off.
49. Set Convert Incoming Voice to Chat Text to Off. This should reduce the chatter in the game and make it less distracting.
50. Click on apply and test the game.
Optimizing CPU Power Options
To get the best out of Apex Legends, you need to make sure that your CPU is running with the best possible settings. It’s important to note that the following steps may overtax and increase your CPU’s temperature. Before going ahead with these steps, you need to ensure that you have the best possible CPU cooler.
1. Open the Windows Power User Menu (Win + X).
2. Select Power Options.

3. Scroll down to Related settings and select Additional power settings.
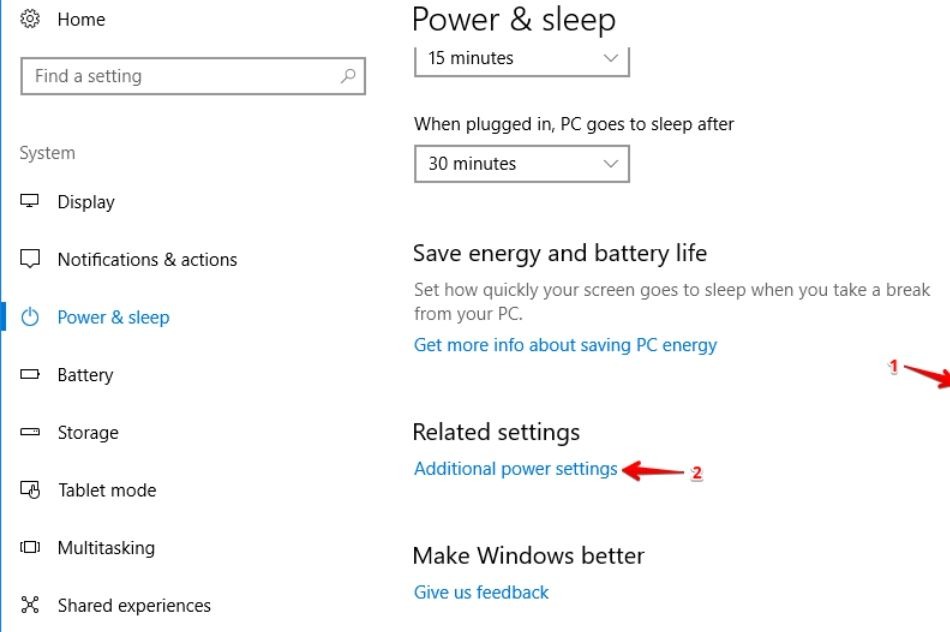
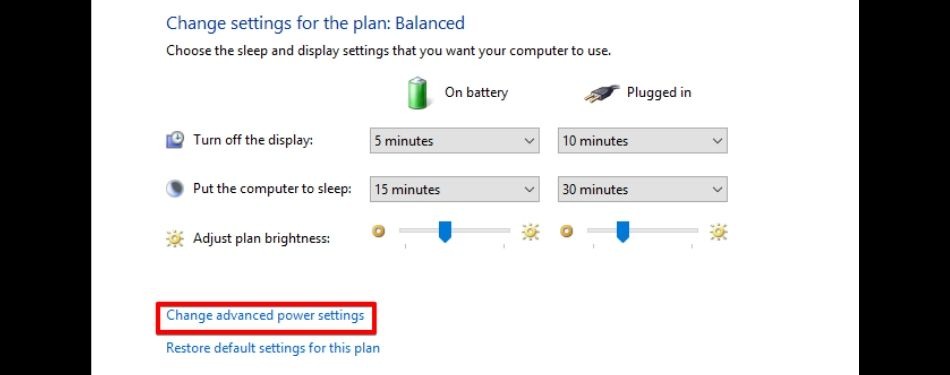
4. Click on Change plan settings in the main window.

5. Select Change advanced power settings.
6. Scroll through the list until you find Processor power management and expand it.
7. Expand the Minimum processor state.
8. Set Plugged In to 100%.
9. Click on Apply and then OK.
Optimizing Compatibility Settings
Another way you can increase Apex Legend’s performance on your PC is by tweaking its compatibility settings. There is one setting that we need to look at in particular and that’s the full-screen optimization setting.
- Navigate to where Apex Legends is installed on your computers (C: > Program Files > Origin Games > Apex).
- Right-click on the r5apex.exe file.
- Select Properties.
- Click on the Compatibility tab.
- Tick the Disable fullscreen optimizations checkbox
- Click on Apply and then OK.
Optimizing Your PC for Apex Legends
In this section, we will cover some general tweaks and tips for your PC. These tips should help you run Apex Legends with less impedance and optimize Windows for gaming.
Turn Game Mode Off
1. Open the Windows Power User menu and select Settings.
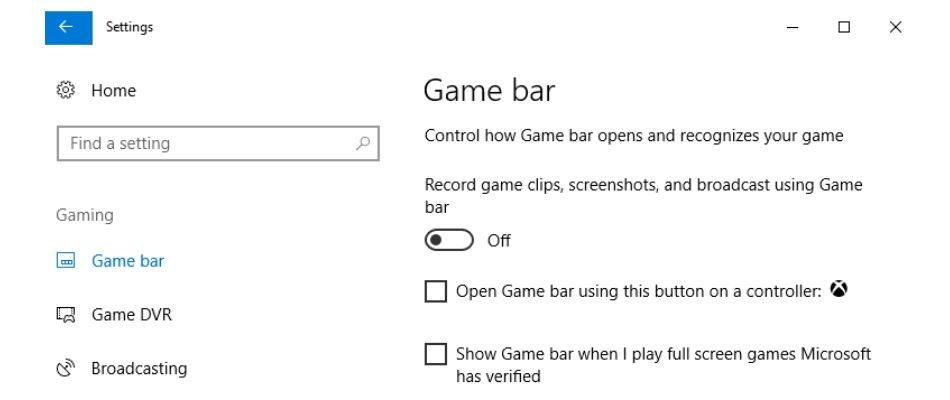
2. Click on Gaming.
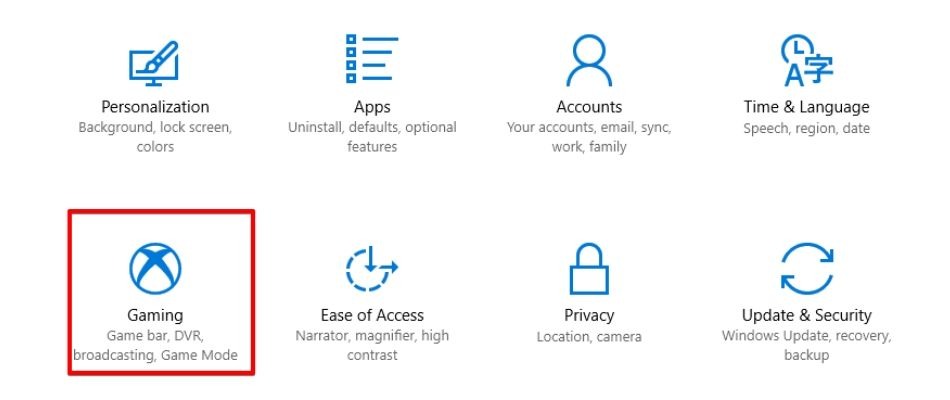
3. You’ll see a switch for an option labeled ‘Record game clips, screenshots, and broadcast using Game Bar’. Set the switch to off.
4. Untick the checkbox labeled ‘Open Game bar using this button on a controller…’.
5. Untick the checkbox labeled ‘Show Game bar when I play full screen game Microsoft has verified’
6. Click on the Captures setting and set the option marked ‘Record in the background while I’m playing a game’ to off.
*Note: You may not have this option.
7. Click on the Game Mode setting and then turn off the ‘Game Mode’ option.
*Note: You may not have this option either.
Adjusting Windows Performance Settings
1. Right-click on This PC on your desktop (assuming you have the shortcut there).
2. Select Properties from the context menu.
3. Click on Advanced System Settings.
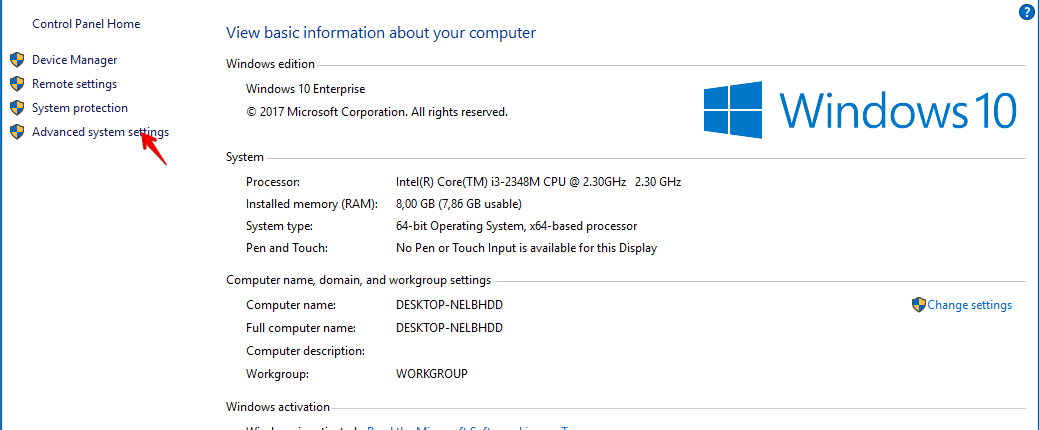
4. Make sure that the Advanced tab is selected. Under the Performance section, click on the Settings… button.
5. Ensure that the Visual Effects tab is selected and then click on the radio button marked ‘Adjust for best performance’.
6. Click on Apply and then OK.
Emptying your Temp Folders
1. Open the Windows Run dialog (Win + R).
2. In the Open text field, type in %temp%.
3. Click on the OK button.
4. Select all the files and subfolders in this folder (Ctrl + A) and permanently delete them (Shift + Delete).
5. Skip any file that may be opened by a program.
6. Open the Run dialog again (Win + R).
7. Type ‘temp’ (without inverted commas) into the Open text field.
8. Click on the OK button.
9. You may be asked for access permissions. Click on Continue.
10. Once again, select all the files and subfolders in this folder (Ctrl + A) and permanently delete them (Shift + Delete).
11. Open the Windows Run dialog.
12. This time, type ‘prefetch’ into the open text field (without inverted commas).
13. Click on the OK button.
14. Again, you may be asked for access permissions. Click on the Continue button.
15. Select everything in the temp prefetch folder and delete it.
Disable One Drive
You can temporarily disable OneDrive by clicking on the tray icon on the taskbar and selecting Exit from the context menu. However, if you want to disable OneDrive completely, follow these steps:
1. Double click on the OneDrive icon in the notification area/ tray menu.
2. Select More.
3. Click on Settings.
4. Click on the Account tab.
5. Click on Unlink this PC.
6. Click on Unlink account.
7. Close settings.
8. Open the Windows Power User menu (Win + X).
9. Click on Windows PowerShell (Admin) or Command Prompt (Admin).
10. In the console window, type in taskkill /f /im OneDrive.exe and press enter. This will stop any OneDrive processes that may be running.
11. If you’re using a 32-bit version of Windows, type in: %SystemRoot%\System32\OneDriveSetup.exe /uninstall
If you’re using a 64-bit version of Windows, type in:
%SystemRoot%\SysWOW64\OneDriveSetup.exe /uninstall
12. You can then close the console window.
Optimizing Discord
1. Run Discord.
2. Navigate to the User Settings page.
3. Click on the tab marked ‘Appearance’
4. Untick the checkbox marked ‘Hardware Acceleration’.
Optimizing Google Chrome
1. Run Google Chrome.
2. Click on the three vertical dot icon on the top right-hand corner of Google Chrome.
3. Select Settings from the context menu.
4. On the left panel, scroll down and expand the Advanced option.
5. Underneath the tree of items that appear, click on System.
6. In the menu window under the System section, set the option labeled ‘Continue running background apps when Google Chrome is closed’ to off.
7. Set ‘Use hardware acceleration when available’ to off.
8. Relaunch Chrome and then close it again.
Final Thoughts
Making sure that you have the best settings for Apex Legends is only part of the equations Peripherals are an important part of gaming. You need to ensure you have the right keyboard and mouse. Input and output sound are important parts of Apex Legends.
If you plan on playing the game in a team, you have to ensure that you can communicate with your teammates. The best way to do this is through a top-tier gaming headset. To cut loading times, we suggest you replace your old HDD with a fresh new SSD. You’ll also need a monitor with high refresh rates.
Once you’ve incorporated all the tweaks and settings in this guide, all that’s left to do is get ‘gud’. We hope you’ve found this guide to be helpful. Thank you for reading and remember to have fun.
Related: Apex Legends Crashing