You would have thought that Fortnite and Apex Legends would have killed off PUBG by now, but no, the game is still going strong. In fact, PUBG will forever be etched into the Mount Rushmore of Battle Royale games.
There is no point in debating which is better, Fortnite or PUBG because if it wasn’t for PUBG, Fortnite would probably never exist. However, the great thing about competition is how it pushes old dogs to learn new tricks.
PUBG is currently better than it’s ever been and it’s never too late to join in on the fun. If you’re new to PUBG, the following guide will show you how to tweak PUBG’s settings to get the best performance from your computer.
Best Settings for PlayerUnknown’s Battlegrounds
A little lag is the worst thing to die over. If you plan on surviving a couple of matches and beating your rivals, you’ll need to ensure that your PC is well optimized. In this guide we’ll go over the PUBG’s system requirements, the best settings for PUBG, some tweaks you can apply to your Windows PC to help it run PUBG smoothly as well as discuss what’s the best gear to use with PUBG.
Related: Best Apex Legends Settings
PUBG System Requirements
Before running PUBG, you need to ensure that you have the best possible gaming PC to run it. In this section, we’ll cover the minimum and recommended system requirements for PUBG.

PlayerUnkown’s Battlegrounds Minimum System Requirements
- Operating System: Windows 7/8/8.1/10 (64 bit)
- CPU: 4th Generation Intel Core i5 or AMD FX-6300
- RAM: 8 GB
- Graphics Card: NVIDIA GeForce GTX 960 2GB or AMD Radeon R7 370 2GB
- DirectX Version: 11
- HDD/SSD Storage: 30GB
- Network: Broadband Internet connection
PlayerUnkown’s Battlegrounds Recommended System Requirements:
- Operating System: Windows 7/8/8.1/10 (64 bit)
- CPU: 6th Generation Intel Core i5 or AMD Ryzen 5 1600
- RAM: 16 GB
- Graphics Card: NVIDIA GeForce GTX 1060 3GB or AMD Radeon RX 580 4GB
- DirectX Version: 11
- HDD/SSD Storage: 30GB
- Network: Broadband Internet connection
Best PUBG Graphics Card Settings (NVidia)
The first thing you need to fine-tune and customize is your graphics card. In this section, we will show you how to prepare your NVidia graphics card for PUBG.

- Open the NVidia Control Panel. This can be accomplished by right-clicking on an empty space on your desktop and then selecting ‘NVidia Control Panel’ from the context menu. It’s also accessible from the Windows Control.
- Once you have the NVidia Control Panel open, click on the “Manage 3D Settings” option.
- On the Manage 3D Settings screen, you’ll see two tabs, Global Settings, and Program Settings. Click on the Program Settings tab.
- Before the next step, you need to ensure that the checkbox marked “Show only programs found on this computer” is ticked. Once that’s done, click on the drop-down menu labeled “1. Select a program to customize” and search for PlayerUnknown’s Battleground from the list.*Note: If you cannot find it from the drop-down list, click on the Add button and try to manually search for it in your file system. It should be in the Steam folder.
- Next, we need to set the settings for the game. The first setting we need to look at is Maximum pre-rendered frames. Make sure that it is set to 1.
- Change Monitor Technology to G-Sync. Do not worry if this setting is not available, just skip it and go to the next step.
- Change Power Management Mode to ‘Prefer maximum performance’.
- Next, you need to set V-Sync (Vertical Sync) to ‘Off’.
- Set Preferred Refresh Rate to ‘Highest available’
- Change Multi-Display/Mixed-GPU Acceleration to ‘Single display performance mode’ if the option is available.
- Set Threaded Optimization to ‘On’.
- Once that’s done, you can close the Nvidia Control Panel. It’s also good practice to restart your PC and opening Nvidia Control Panel to double-check if the settings have been saved.
Additionally, you might want to check out PUBG ReShade workarounds and improve the graphics further.
Best In-Game Graphics Settings for PUBG
If you’re basically scraping through and only meet the recommended settings by a tiny margin, this section is catered more towards you. You may not have the best gaming graphics card but these in-game settings will help you squeeze some more FPS out of the game. Even if you have a mid-range card that can handle PUBG easily, you should apply these settings for the best possible performance.

- While you are in the game, open the Pause/System Menu and then select ‘SETTINGS’.
- By default, it should open on the Graphics tab.
- Scroll down to Quality/Advanced Settings
- Use the slider and set Screen/Render Scale to 100.
- Set the FPP Camera FOV to 103
- Set Anti Aliasing to Very Low.
- Set Post Processing to Very Low.
- Set Shadow to Very Low.
- Set Textures to Medium or High.
- Set Effects to Very Low.
- Set Foliage to Very Low.
- Set View Distance to Medium.
- Disable V-Sync and Motion Blur.
- Leave everything else as it is.
- Once you are done modifying all these settings, click on the ‘APPLY’ button. Then you can click on the CLOSE/BACK button and test the game out.
Best Sound Settings for PUBG
Now that you’ve set the graphics settings for PUBG, let’s set the Audio settings. The only audio setting we need to worry about is HRTF. It will help you figure out which direction a gun is being discharged.

- As before, while you are in the game, open the Pause/System Menu and then select ‘SETTINGS’.
- By default, it should open on the Graphics tab. Click on the Audio tab, which is directly on the right of the Graphics tab.
- Next, scroll down to HRTF, it should be just below the Gameplay setting. Enable HRTF.
- Once that’s done you can click on the APPLY and then click on CLOSE/BACK.
Best Control Settings for PUBG
If you want to have an advantage over the competition in PUBG, then you’re going to have to fine-tune your controls.

- While you are in the game, open the Pause/System Menu and then select ‘SETTINGS’.
- Click on the tab marked ‘Controls’.
- Scroll down to Mouse and set the Vertical Sensitivity Multiplier to 1.20 using the slider. This will increase the sensitivity of your vertical mouse movements, not the horizontal. This makes your aim a little more accurate, particularly when you’re spray controlling.
- Next, you need to scroll down to the Key Input Method section. Once you’re there, set Crouch to Toggle so you don’t have to continuously press the crouch key every time you need to crouch.
- Set Peek to Toggle. This will make it easier to move, aim and shoot while peeking.
- Set ADS to Hold. This makes it quicker to engage and disengage while aiming.
- You can leave everything as is or customize them to suit your playing style.
- Once that’s done, you can click on the APPLY button then the BACK button.
Best Gameplay Settings for PUBG
The final set of in-game settings we need to pay attention to are the gameplay settings. Key binding settings can be customized to suit your playing style.
- While you are in the game, open the Pause/System Menu and then select ‘SETTINGS’.
- Click on the tab marked ‘GAMEPLAY’.
- Under UI, disable Inventory Character Render. This will improve inventory loading times and the overall gameplay performance better.
- Set Color Blind Mode to Protanopia. This will make it easier for you to spot an enemy that has been shot, especially in environments with a lot of plantation and foliage.
- Under Functionalities, set the firing mode for all your weapons (Handguns, SMGs, ARs, DMRs) to Full Auto.
- Everything else can be left as is or customized to suit your playing style.
- Once that’s done, you can click on the APPLY button and then on the BACK button and test the game out.
Launch Properties for PUBG
In this section, we’ll discuss the best PUBG Launch options and properties on Steam. This will help Steam launch the game quicker and play more smoothly.

- Launch Steam.
- Locate PUBG in your library.
- Once, you find PUBG in your library, right-click on it.
- Select properties from the context menu.
- Click on the General tab (if it isn’t already selected) and then click on that button labeled “Set Launch Option“.
- Next, you need to type in the properties as follows. Make sure to separate each property with a dash, not a white space:
- -refresh 144
You need to set this option according to your monitors refresh rate. If your monitor has a 144 Hz refresh rate, you need to set it 144. If you have 60 Hz, you need to set the option to 60. This will force the refresh rate to stick to one number. - –maxMem =10000
This option allows you to specify the amount of RAM you’d like to allocate to the game. This value is written in MB. As an example, if you have 12GB of RAM in your computer and want to allocate 10GB, this value is written like so: 10000 - -malloc=system
If you prefer the operating system to allocate the amount of RAM to be used by the game, you can negate the previous property (-maxMem) and use this one instead. - –USEALLAVAILABLECORES
This option will allow Steam and PUBG to unlock all available cores on your CPU. This maximizes the game’s performance. - –sm4
This option forces the game to use DirectX 10’s Shader Model 4 as opposed to DirectX 11’s Shader Model 5. This will not create a noticeable dip in graphics or performance. However, it should make the game run a little smoother. - –novsync
This will force the game to disable vertical sync. V-Sync is used to stop the screen from tearing when you’ve exceeded your computer’s refresh rate. If you find that your FPS dips below 60, then I suggest you add this option. - Once, that’s done, make sure that the final string looks like this: -refresh 144–maxMem =10000-malloc=system–USEALLAVAILABLECORES–sm4–novsync.
- Click on the OK button and restart Steam.
Best PUBG Engine.ini Options
If you’re still not satisfied with the way PUBG is performing on your PC, then your next best option is to edit the PUBG Engine.ini file.

- Make sure that Steam and PUBG are closed
- Open the Windows Run dialog (Win+R).
- Type in %localappdata% in the text field.
- This will open Windows File Explorer on your local folder. Navigate to the folder labeled TsIGame.
- Click on the Saved folder.
- Select and open the Config folder and then click on the WindowsNoEditor folder.
- Search for the Engine.ini file and then right-click it and edit it with Windows Notepad or Notepad++.
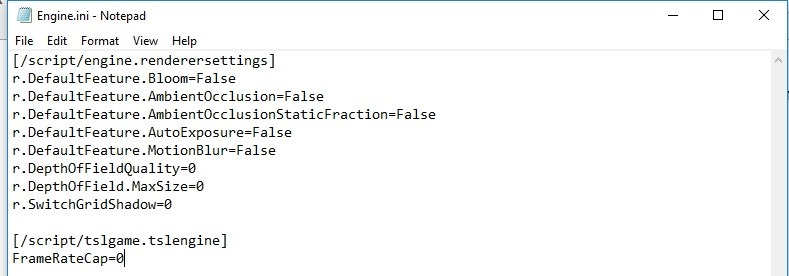
- Select all the contents in the .ini file and delete them. Then copy and paste the following into the .ini file:
-
- [/script/engine.renderersettings]
- /script/engine.renderersettings]
- r.DefaultFeature.Bloom=False
- r.DefaultFeature.AmbientOcclusion=False
- r.DefaultFeature.AmbientOcclusionStaticFraction=False
- r.DefaultFeature.AutoExposure=False
- r.DefaultFeature.MotionBlur=False
- r.DepthOfFieldQuality=0
- r.DepthOfField.MaxSize=0
- r.SwitchGridShadow=0
- [/script/tslgame.tslengine]
- FrameRateCap=0
- Save and close the file. Then open and test PUBG.
Best PC Optimization Tweaks for PUBG
If you want the best performance from your PC in general, not just for PUBG, you’ll need to optimize it and tweak it a bit. This includes optimizing programs such as Discord and Google Chrome. We all know how Discord can have routing errors and update issues.
In this section, we’ll cover a few tips to help your PC perform better so it can run PUBG better.
Discord
Not so surprisingly, if you are running discord, it can hamper your PC’s performance. This is how you can optimize it to use fewer system resources:

- Run Discord or navigate to the website.
- Navigate to the User Settings page/screen.
- Click on the Appearance tab and disable Hardware Acceleration.
Google Chrome
Besides its privacy issues, Google Chrome is widely criticized for hogging system resources. This is especially noticeable if you’re running Chrome with a bunch of extensions.

- Click on the Kebab Menu/ More Options icon on Chrome and then open Settings.
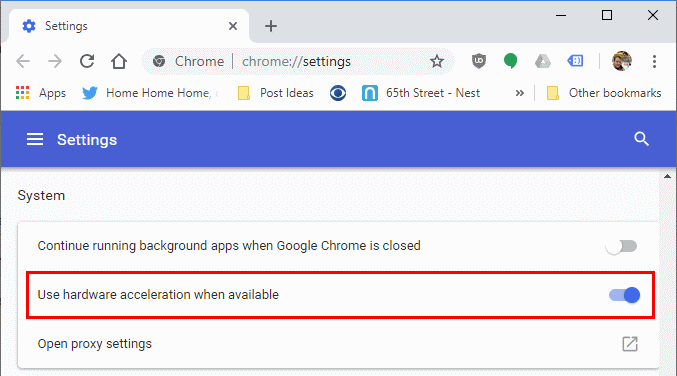
- Search for the ‘Use hardware acceleration when available’ option. It should be under the System section.
- Once you’ve found the option, disable it.
- Restart Chrome and then close it again.
Cleaning Temporary Files
Sometimes applications leave behind residual temporary files that can take up unnecessary space on your hard drive. The more files on your PC, the slower your hard drive. This can be remedied by deleting a few unimportant files.

- Open the Windows Run Dialog (Win+R).
- Type in %temp% in the open text field.
- This will open the temporary folder. Select all the files and subfolders (Ctrl+A) and then delete everything (Shift+Delete). Skip any files that can’t be deleted.
Best Gear for PUBG
If you plan on fully dedicating yourself to playing PUBG and battle royale games in general, you need to have the best gear. In this section, we’ll be covering the best gear to get for PUBG.

Best Mouse for PUBG
Personally, I prefer Razer Basilisk. It’s cheap, affordable and has decent DPIs. It also comes with eight programmable buttons, RGB lighting and customizable scroll resistance.
However, if it doesn’t suit your fancy, you can peruse through our list of the best mice for PUBG. I’m pretty sure you’ll find something more suitable to your style of play.
Best Keyboard for PUBG
A keyboard that seems to be very popular with the pros is the Corsair K70 RGB MK.2. It’s a surprisingly quiet mechanical gaming keyboard. It’s beautifully lit with RGB LEDs. It also includes a USB pass-through and media control buttons.
Honestly, it’s one of the best keyboards that Corsair has ever created. But it’s a little pricey. If you’re looking for alternatives, you can visit our list of the best keyboards for Fortnite. It will provide you with a wide variety of great Battle Royale keyboards to choose from.
Best Headset for PUBG
In PUBG, the sound is very important. You need to hear footsteps, where a gun was discharged and where a gunfight is happening. You’ll also need a microphone to chat with your friends.
Your best option is to get a headset. I’ve found that SteelSeries Arctis 7 is the best gaming headset for me. It’s great for both the mobile and PC versions of PUBG. It’s wireless but offers a lossless sound. However, it’s not cheap.
For a better range of options, check out our guide on the best headsets for PUBG. It is packed with a list of great alternatives that will not cost you an arm and a leg.
Final Word
It’s important to remember that a lot of the tips in this guide are suggestions. If something doesn’t look right to you or you feel that changing a setting would really impact your experience, you can skip it or implement your own custom setting. In the end, it’s important to do what feels right to you in order to get better at PUBG.
Remember to take breaks between gaming and stay hydrated. I hope you have found this guide to be helpful. Thank you for reading and happy gaming.