How to perform GPU stress testing? Well, merely tell your graphics card that it’s getting replaced by a high-quality gaming GPU and you’ll put it under tons of stress and cause insecurity.
But seriously…
Simply put, stress testing is the process of pushing your GPU to its limits using testing applications. This involves introducing higher electrical power and cooling solutions to the GPU in order to find out the absolute limits.
Why Stress Test?
If you’re an enthusiast like me, the answer is pretty simple. You want to.
Games never really push the GPU to its limits. Yes, some games are more graphics-intensive than others, but that doesn’t really translate to stressing a GPU.
Also, it’s true that companies producing these graphics cards do layout their limits. But when it comes to hardware, no two pieces are the same and also, stats on paper don’t replicate exactly in the real world.
This is especially true when you take overclocking into consideration. Overclocking results are often very unique. The same model might at different speeds. It depends on the silicon that you get in your piece.

Now, once you’ve overclocked your GPU, it’s crucial to check for stability. Also, if you’ve overclocked your GPU, chances are, you want to know exactly how far you can push it. Stress tests are the best way to do it.
Finally, PC builders run stress tests all the time. The reasoning here is pretty simple. If you’re a builder, you’ll know that even though you’ve done everything right, sometimes you just don’t get the performance you were expecting.
So, to pinpoint the problem, PC builders run stress tests. The logic is that if your GPU is performing well on the test, you can eliminate it as the source of the problem. You don’t have a GPU bottleneck and now, you can move on and look at other components.
Thankfully, stress testing nowadays isn’t a very difficult thing to do. So, whatever may be your reason, you should be able to stress-test your GPU pretty easily.
Warning! ⚠️
Maybe this is pretty apparent, but we have to say this. Stress testing can damage your GPU. You are, by definition, stressing your GPU. You’re intentionally pushing the GPU to its limits. This might lead to a scenario where you’re pushing way too much power to the GPU, well beyond the manufacture defined limits.
If you do this, obviously, your warranty is null and void. Also, you might breach the safe temperature threshold and end up with a fried graphics card. And this is pretty obvious too, but it needs to be mentioned. You’re responsible for your actions on your GPU. We are not!
So, there’s that…
Preventing a Fried Gpu Situation
While the warning is true and you can fry your GPU, the chances are pretty low. That is if you take a few steps.
The best way to prevent overheating or overpowering your GPU is by simply monitoring and documenting everything that you’re doing. So, keep a note of the power that you’re inducing, monitor the temperature, and always be ready to completely abort the test safely.
While the exact figure varies slightly from product to product, usually, temperatures above 92 degrees Celcius is a clear indication to stop the entire process immediately. Continuing will usually lead to permanent, irreparable damage to your GPU.
Stress Testing Software
Now that we’ve got all the disclaimers out of the way, let’s get testing!
First off, you need a testing software. There are some great ones out there. Here are a few applications that we prefer for the tests that we do over here:
#1 FurMark
FurMark is my favorite tool. It does its job brilliantly and it’s free. FurMark is a benchmark tool that’s been a favorite of the enthusiast community for a long time. The advantage of FurMark is how up-to-date it is.
If there’s a GPU on the market, it’s on FurMark. The updates are regular, it’s easy to use if you’re a beginner, and most important of all, it’s a comprehensive test application. I’ve personally never seen another testing benchmark that’s so good at checking the stability of a GPU.
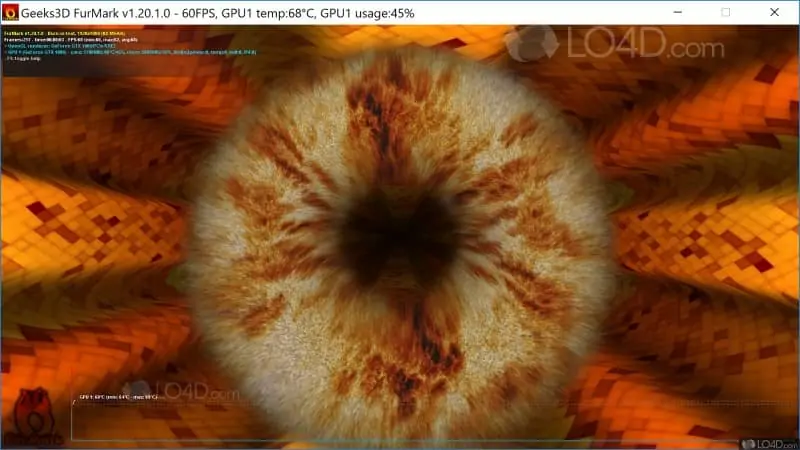
However, if you’re planning to run a long test to check for prolonged stress, FurMark might not be the best choice. Extended testing isn’t FurMark’s strength.
#2 Unigine Heaven
Say hello to the most famous GPU testing tool in the market. Unigine is an old dog of GPU testing. The reason Unigine is still relevant today, even after 10 years, is its ability to test for real-world scenarios.
Hardware testers swear by Unigine Heaven. It checks for stability and more importantly, it has a huge database of GPUs. So, even if your GPU is from the 90s, you’ll find it on Unigine Heaven.
Also, Heaven is very pretty to look at. With FurMark, you’re literally looking at furs when you’re testing. With Heaven, you see dungeons, ships, and castles suspended in the air. There are a lot of swooping shots of clear blue skies and whatnot.
Is that really important for the testing? Not really.
But is it awesome to look at? Absolutely!
As far as pricing goes, all testing and benchmarking is free. There’s only one thing that Unigine charges for — prolonged, extended, testing. Unigine offers a feature that puts the testing footage on a loop.
This keeps testing the GPU for however long you want it to. This is important for professional testers, obviously, because we need stability figures for an extended duration. Enthusiasts use it too.
However, the people who really need this test are gamers who play MMORPGs for a long time. If you’re the sort of person who stays up all night long playing something on your PC, you need your GPU to be extra-stable, so to say.
If you fit that bill, you might want to shell out a few bucks for automated loop testing.
#3 Unigine Superposition
If you have a mid-range GPU or an old GPU, don’t bother with Superposition. It’ll chew through your card in about 15 minutes and spit it out.
Superposition is one of the most technically demanding tests out there. It’s not as pretty as Heaven to look at, but it’s more clever. It has an elaborate shading, lighting, and movement tracking algorithm and as a result, it puts more stress on the GPU.
And I’m not exaggerating its strength here. I’ve seen GTX 900 series GPUs keel over on this test. So, unless you’ve got a modern, high-end GPU that sits at the tippy top of the GPU hierarchy or a VR setup, you can ignore Superposition.

Pricing is similar to Heaven. Everything’s free to use. Extended tests and VR testing are paid tests.
(Actual) GPU Stress Test
At this point, I’m assuming you have two things. One, your testing application, and two, your overclocking or monitoring software.
Step 1: Overclock
Overclock your GPU to your desired speed. Now, if you don’t want to overclock and are just interested in testing your GPU at stock speed, then this step is irrelevant to you.
If you do want to overclock but don’t know how to do it safely, we’ve got comprehensive guides on GPU overclocking and CPU overclocking. Read them once and proceed to the next step.
Step 2: Open Relevant Applications… and Close Everything Else.
If you’ve decided to overclock, at this point, you should have already done that. So, apart from the overclocking software, close every other application on your computer.
Do not run any visual media programs. Netflix can wait! Stress tests are named so for a reason. Adding any more media burden to the GPU is strongly discouraged. This holds true for the entire duration of your testing.

Running media applications may lead to corrupt results, which you may be okay with. However, it can also crash your system. I don’t think you want that to happen.
If you’re not overclocking your GPU, open your system monitoring software of your choice. They are lightweight applications and consume negligible resources.
If you’ve made it till here, you now have your overclocking or system monitoring software open. Everything else is closed.
Step 3: Testing
Open the testing software of your choice. Whatever the application you might be using, you’ll see a big “Run Test” button. Click on it. That’s it.
You’re now officially stressed testing your GPU. While this is happening, your eyes might wander to the various other buttons on the software that allows you to change the resolution, presets on your GPU, and so on…
If you’re new to this, ignore every single button that you see. Click on “Fullscreen” and leave it there. Now, take in the beautiful sights that the application will show you.
Again, make sure to keep an eye on your monitoring application as you test your GPU. Even in fullscreen mode, you must be able to get the monitoring application on top. Continuously check for temperature. As mentioned at the beginning, anything around and over 92 is bad… very bad.
Step 4: Decide a Time Frame
Now, it’s just a matter of waiting for however long you want to test your GPU. If you’re using FurMark, 1 hour is the max testing period. After that, it’ll damage your GPU.

The point of testing for any duration is to check how stable your graphics card is. Depending on how long it’s stable for, you can make an educated guess on what it can be used for. Let me list a few well-known stability time frames
30 minutes — Stable
If your GPU is running on FurMark, Heaven, or on Superposition for half an hour, you can go ahead and proudly declare that your overclock (or stock GPU) has achieved basic stability. This means that you can safely use it for movies, songs, and so on.
You can also do intensive gaming for at least 2-3 hours.
Almost every stock cooler should pass this test. If you’ve overclocked your GPU and it fails here, the conclusion is pretty simple. You’ve overclocked way too much or your cooling isn’t powerful enough.
Hard on the fans, softer on the overclock. Press on!
1 Hour — Stable for Most People
Half hour stability is easy. Unless you’ve overclocked way too much, you should be able to clear that. The best duration of testing, for most people, is one hour. If your GPU lasts for an hour, your overclock is pretty stable.
It’s almost guaranteed that you can easily game for 6 hours on a trot. For overclocking enthusiasts, this is a great hurdle. If you’ve crossed the one hour mark, good job on the overclocking.
Your GPU is now cleared for almost every real-life application.
8 Hours — Zen Stability
This level of stability is not needed for most people. However, ‘most people’ scenarios have never stopped enthusiasts from trying.
The people who really need to test for 8 hours are marathon gamers who play all night long, professional game streamers, and people who are into mining. Apart from those groups of people, I can’t really think of a real-life application for the 8-hour stress test.
However, like me, if you just do it for fun and because you’re curious about your overclock stability, then the 8-hour stress test is the ultimate test. And at this point, it’s also important to mention that if you haven’t overclocked your GPU, you don’t have to do this test.
There’s really not much that you’ll learn by subjecting a stock GPU to an 8-hour stress test. If you’ve overclocked, you might want to see exactly how stable your overclock is and therefore it makes sense to run an intensive test on your GPU for 8 hours straight.
This is where that auto-looping test that you paid for matters. You can start the testing late night and go to sleep with the test on. By sunrise, you’ll have an answer.
If your GPU does clear this test, then… awesome! You are cleared for everything, at this point. Congratulations, you’ve reached Zen Stability.
Conclusion
That’s pretty much all there is to GPU testing. If you’re careful and monitor your temps and power carefully, there’s no reason for anything to go wrong.
So, get to it and let us know how you fared!