Have you ever watched a live stream or YouTube video and thought to yourself: “I can do it better”? Maybe your video game reviewing talents are far superior to Angry Joe’s. Maybe you’re a better gamer than Lea May, more charismatic than Ninja, prettier than xMinks but way less obnoxious than PewDiePie.
However, an unfortunate lack of funds has killed your dreams of ever becoming the next most viewed internet celebrity. If you want to be taken seriously as an online pro-gamer, you need a sturdy gaming chair, a decent microphone, top-notch headphones, an above-average webcam and recording, streaming and editing software.
This can all be very expensive. That’s why we need to thank the Open Source gods for programs such as OBS. In this guide, we will talk about how you can use it to record your desktop as well as games.
What is OBS
Open Broadcaster Software (OBS) is an open-source software suite made for recording and live streaming. It’s primarily written in a programming language known as QT, which is the same programming language used by popular desktop applications such as the VLC media player and Scribus.
One of the advantages of QT is it gives developers the ability to easily create portable cross-platform software like OBS. OBS has a large community of users and developers supporting it on all it’s available platforms. This ensures that OBS is consistent. OBS is available on Windows (7+), Linux and Mac.
How to Record Your Desktop Screen with OBS
If you are a newcomer and have not installed OBS yet, you can follow the official installation instructions on the OBS website. It should give you all you need to build and/or install OBS on your preferred platform. OBS’s interface is uniform throughout all platforms. Therefore, the tips in this guide should work on all supported operating systems. Without further ado…
How to record your screen
- Run OBS Studio and make sure it’s maximized (full screen)
- If you’ve made no changes to the main window’s interface, at the bottom of your screen you should see five mini windows labeled: ‘Scenes’, ‘Sources’, ‘Audio Mixer’, ‘Scene Transitions’ and ‘Controls’.
In the Sources mini window/tab, click on the plus (+) button situated on the bottom left side of the mini panel. This will bring up a context menu with a list of all the available source

- From the context menu, click on ‘Display Capture’

- This will bring up a small window labeled ‘Create/Select Source’. Make sure that the ‘Create new’ radio button is selected. You can rename the source or leave it as is. Ensure that the ‘Make Source Visible’ checkbox is ticked then click on the ‘OK’ button. The next screen will allow you to set the properties for your recording.

- If you’re working with multiple displays, you will need to select the display you want to record from the display drop-down menu below the capture screen. If you’ve only got one display, then you can skip this step completely.

- It’s up to you if you want to tick or un-tick the ‘Capture Cursor’ checkbox. Leaving it un-ticked means that OBS won’t record your mouse cursor and its movements. If you’re happy with the properties on this Window, click on the OK button near the bottom right side of the window. This will take us back to the main OBS window.

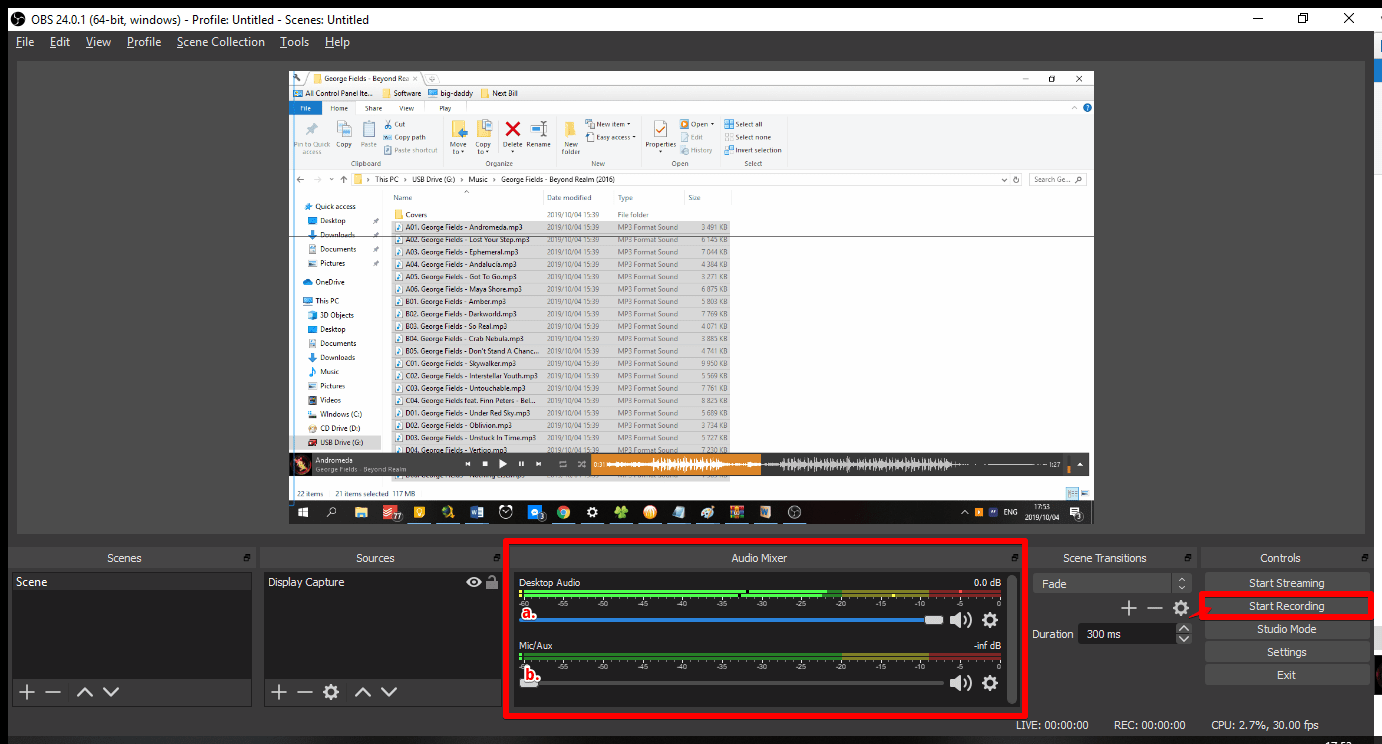
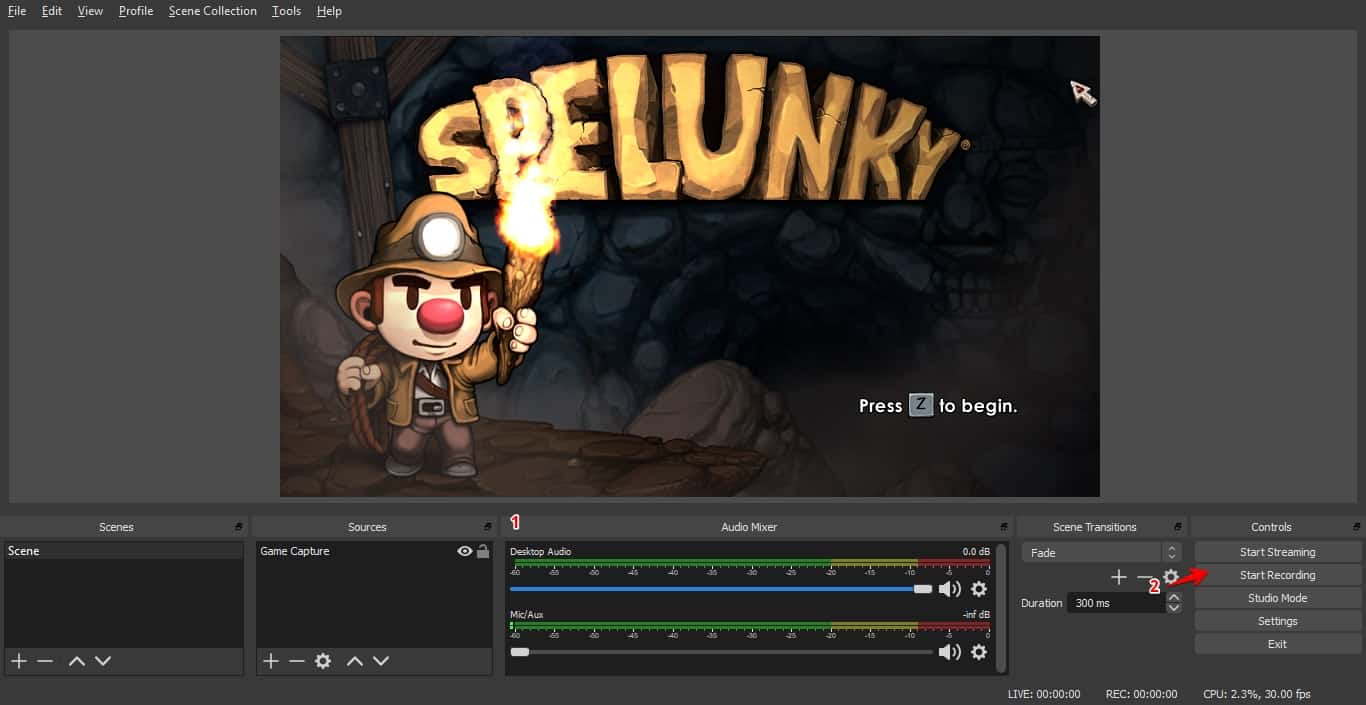
- Now that we have set our (visual) recording properties, we need to set and tune our audio properties. Under the Mixer min-window tab, at the bottom of the main OBS window, you’ll find two sliders.
- Desktop Audio: Controls the volume of the sounds coming from your PC including apps, notification sounds, and music for the recording.
- Mic/Aux: This slider controls the volume of your microphone or any input device hooked up to your PC. If you are planning to do any voice-overs for a tutorial-like video, make sure that this slider is completely up (to the right). If you do not want any outside interference, make sure that the slider is completely down (to the left).
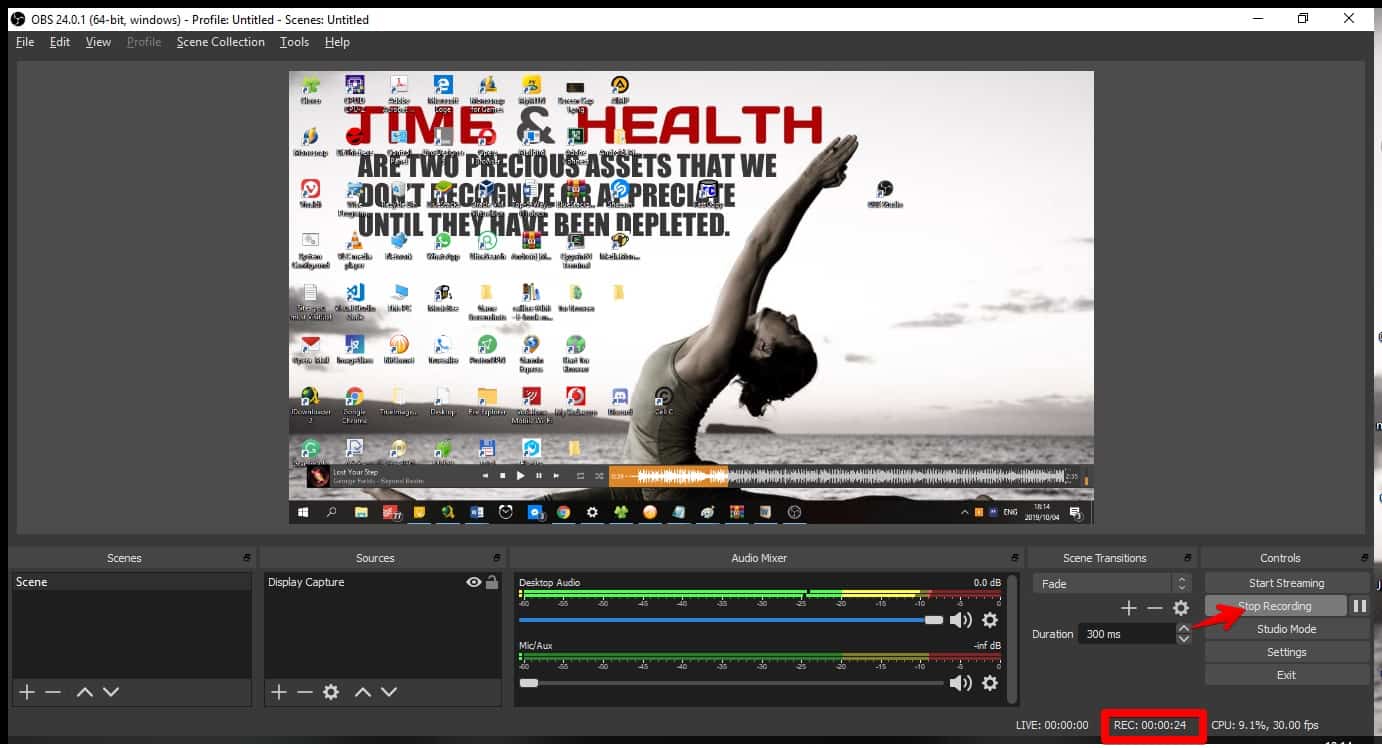
- Make sure you alter the sliders to suit your preferences. Once you are happy with the mixer’s settings, click on the ‘Start Recording’ button. OBS will then immediately start recording your screen and the ‘Start Recording’ button will change into the ‘Stop Recording’ button and a pause button will appear next to it.

- Near the bottom of the main window, you will find various OBS stats and information. You will see stats for Live streams, the CPU performance, Frames Per Second and most importantly Recording. If OBS is recording, the recording stat will reflect how long OBS has been recording so far. If you click on the pause button it will reflect that the recording has been paused (REC: PAUSED).Once you’re done recording, you can click on the ‘Stop Recording’ button. This will save your video in your default videos folder and change the ‘Stop Recording’ button back into the ‘Start Recording’ button. It will also reset the recording stats.

- To find your video, look for it in your operating systems default video folder. The video is labeled according to the date and time it was saved. It should also be saved as an MKV.
- Windows: By default, your recording path is: C:\Users\[User Name]\Videos
- MAC: The default path for recordings is: /users/[User Name]/Movies
- Linux: The default recording path is: /home/username/videos
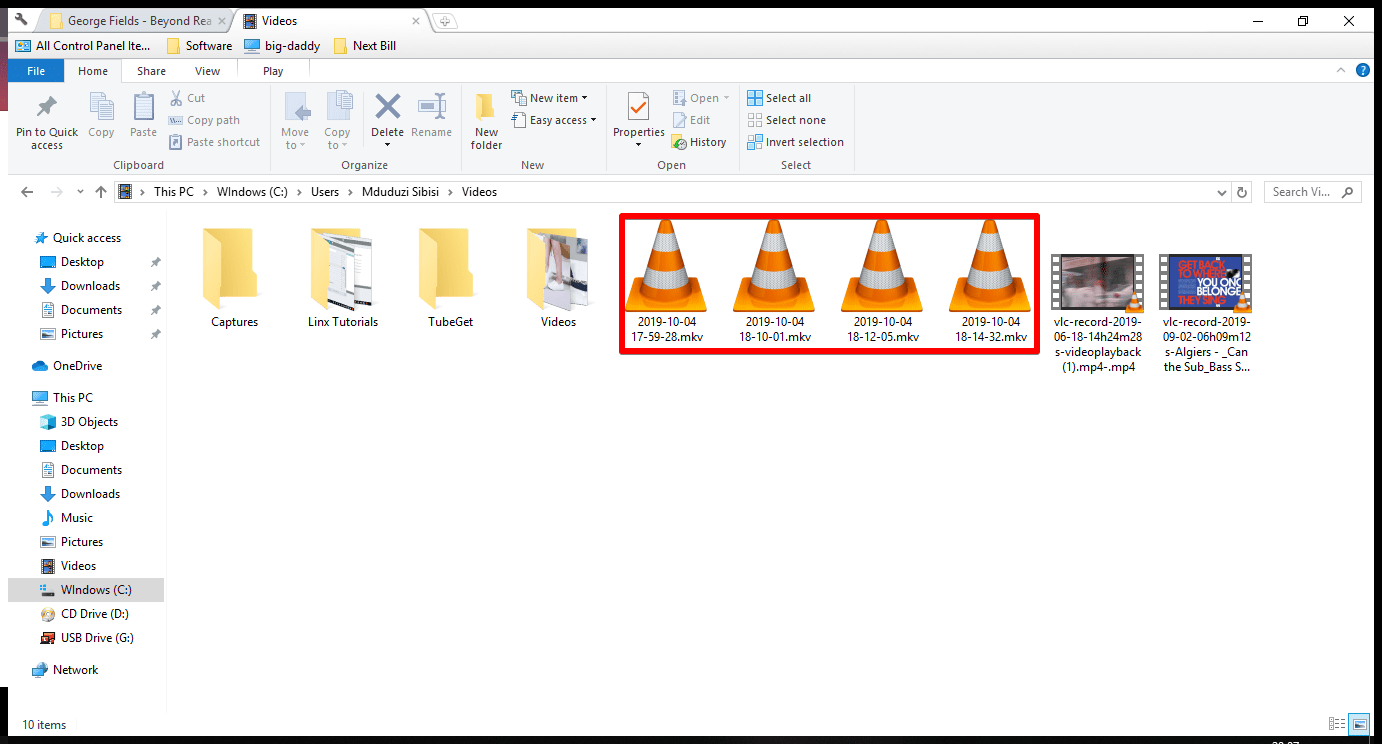
If you want to change the default path where videos are saved, follow these steps:
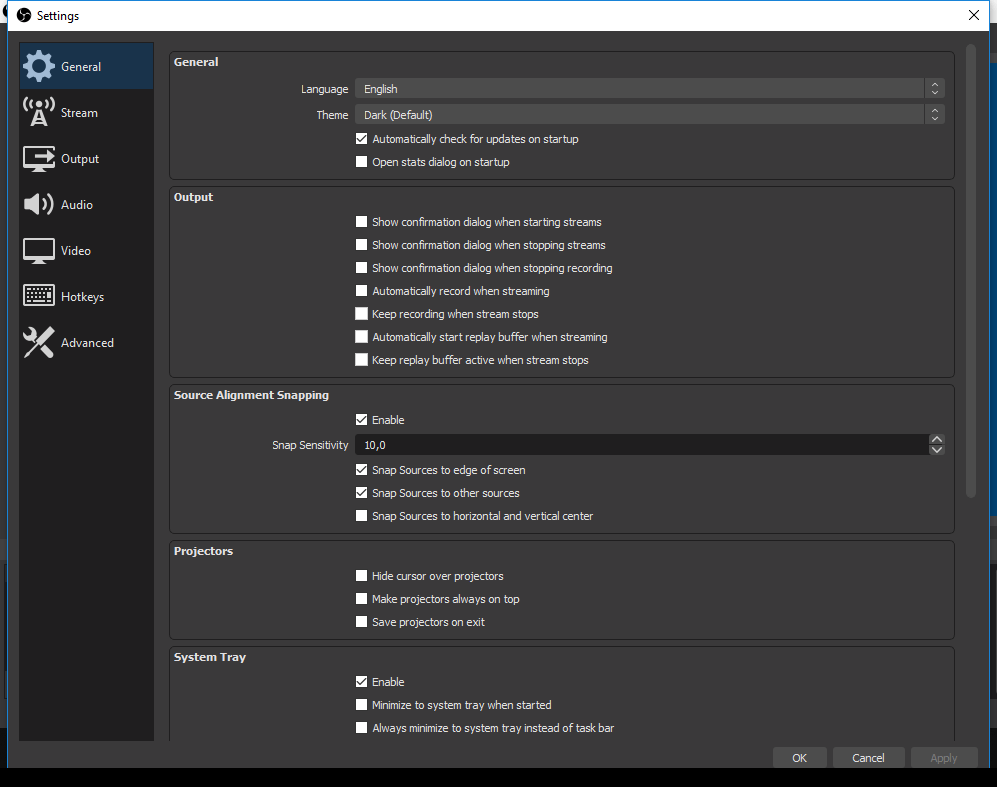
- On the OBS main window, click on the File menu item on the top menu bar and then select Settings. This will bring up the Settings window.

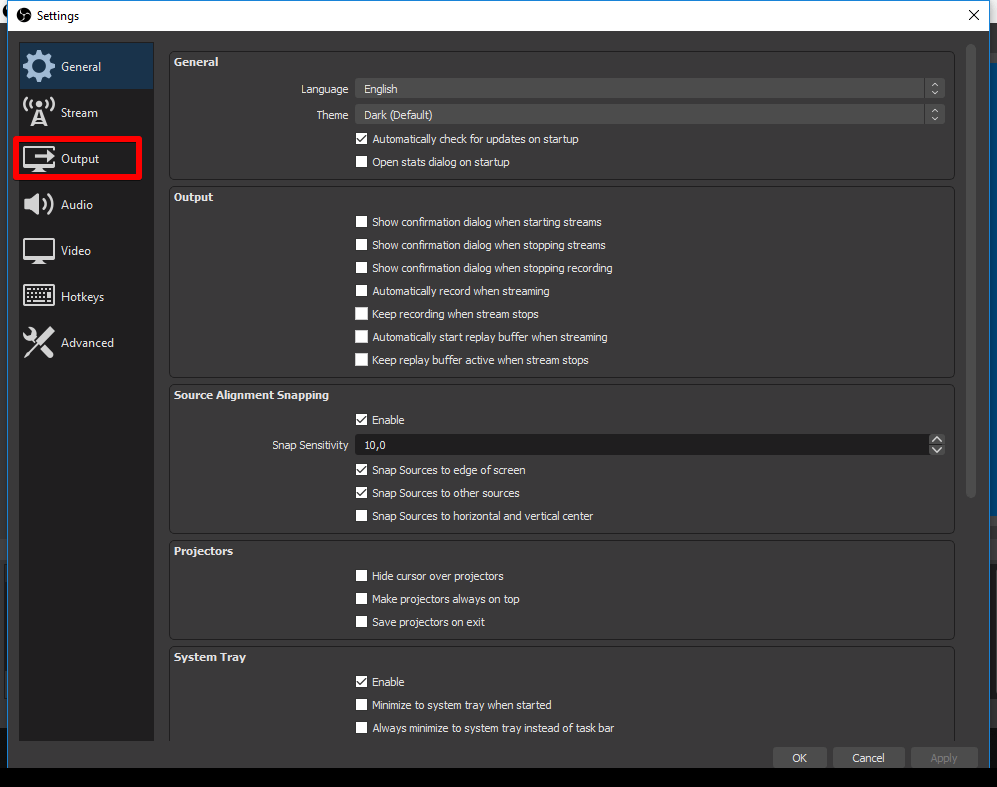
- On the left panel, you’ll see seven different options. Click on Output.

- On the next screen, you will see two sections; ‘Streaming’ and ‘Recording’. Under the recording section, you will see your recording path. You can change it by either editing the path directly through the text-field or by clicking on the Browse button next to it. Change the directory path to whatever you feel is suitable.

How to Record a Game
With OBS, you can record any OpenGL or Direct X game. To capture some in-game footage, follow these steps:
- Run the game you want to play
- Run OBS Studio
- Next, click on the plus (+) button under the Sources mini-window. A context menu with a list of sources will appear
- From the context menu, select ‘Game Capture’. This will bring up the Create/Select Source window.

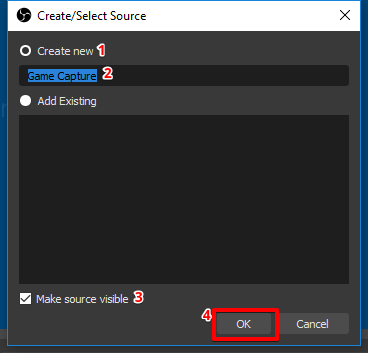
- On the Create/Select Source window, make sure that the ‘Create new’ radio button is selected. It’s also important to ensure that the ‘Make source visible’ checkbox is ticked. You can rename the capture or leave it as is. Once you are done modifying the properties on this screen, click on the OK button. This will bring up another properties window

- Change the mode to ‘Capture specific Window’ from the ‘Mode’ drop-down menu. This will make the Window property visible below the Mode property. Select your game from the Window property drop-down menu. You can leave the other properties as is and click on the ‘OK’ button at the bottom. This will bring you back to the OBS Studio main menu

- Before recording, make sure you adjust your Mixer settings. If you want more details on how to do this, look at step 7 on how to record your screen in this guide
- Finally, you can click on the Start Recording button and run your game in full-screen mode

Once you feel that you have recorded enough of the game, you can switch back to the OBS Studio window (try alt+tab – won’t work for all games) and stop the recording. Once you stop the recording, it will automatically save your video. You can then use some video editing software to cut, edit and trim your video.
Final Words
Using the information in this guide, you should be able to record videos of your desktop and your games using OBS. We know that operating systems like Windows 10 already have tools like the Windows Game Bar, which allows you to capture images and videos of your game as well as stream them.
However, Game Bar’s support is a bit limited as you can only use it to capture videos if your video card uses certain encoders (AMD VCE, NVidia NVENC, and Intel Quick Sync H.260).
Either way, if you are working with earlier versions of Windows or any other operating system, OBS studio is an excellent recording tool with some post-production functionality. The best part about it is it is completely free. I hope you have found this guide to be helpful. Thank you for reading.


